
One area of vulnerability for EnviroDIY Monitoring Stations is rodent damage and in particular beavers! The cables for the solar panel can be repaired fairly easily if chewed by squirrels but if a rodent chews the cable for the CTD-10 sensor it is no longer usable for depth measurement because the cable also provides the atmospheric reference for the depth sensor. The greatest threat to the CTD-10 cable are beaver!
Background
I have had two beaver attacks on the Marsh Creek monitoring stations; BCMC3S at Moore’s Rd and BCMC4S at Fairview Rd. Beaver tend to bite anything that gets in their way while in the water and they have very sharp teeth!
In both cases the beaver cut the CTD-10 cable which in addition to the signal wires provides the atmospheric reference pressure for the depth reading which uses the differential pressure between the sensor port and atmospheric reference. This is about 1.5 psi per meter of depth.
These sensors cost $461 each and cut cable can’t be repaired to provide depth readings, so if replacement is not in the budget the signal wires can be spliced and covered with waterproof tape (self-annealing rubber tape) to at least restore temperature and conductivity readings.
-

- Figure 1. Retrieving the beaver damaged sensor at BCMC4S.
-

- Figure 2. Looks like it was cut with wire cutters.
I have implemented a beaver proof design which has been successful so far at Moore’s Rd where beaver attacked a few years ago. I ran both cables thru ¾” aluminum flex conduit attached to the sensor bundle and run up the pole to the Mayfly box as shown in the attached photos (figures 5,6 & 7).
I don’t use a pin in the PVC bundle pipe which is a real PIA to unfashion especially in cold water! Instead a cap with a ¼″ hole in it to prevent flotation seems to work quite well. The sensor bundle rests on the steel forming stake, rebar, or ½” black iron pipe. With this arrangement, the bundle can be removed for cleaning just by pulling up the attached flex conduit.
Installation Details
- Purchase ¾” aluminum flex conduit. It is available at Lowes in 100’ and 25’ lengths.
- Cut to length as measured from the sensor bundle to the monitoring station. Screw in conduit fittings which will protect the cable from the sharp edges of the cut conduit. I recommend cutting the conduit by clamping in a vise and cutting with a hacksaw.
- Feeding sensor cables through the conduit:
- Remove cables from monitoring station (see figure 3) by loosening the gland seals completely. The CTD cable is a 3.5mm plug and you will need to push up to get access to unplug. The OBS sensor has six wires that need to be removed from the mini terminal strip with a jeweler’s screw driver. The wires are from left to right: blue, white, red, green, gray (shield), and black. I recommend you take a picture before you disconnect the wires.
- With the cables removed from the Pelican box wrap the cables together with masking tape in preparation for pulling through the conduit.
- Unless the run is really short you can’t push the cable through the conduit so use an electrician’s fish tape, stiff wire or a metal tape measure if it will fit. Fasten the prepared cable end to the fish. I recommend Gorilla brand duct tape — very sticky and therefore less chance of separating from the cable you are trying to pull through. Lay the conduit out straight and have your helper at the other end to feed the cable while you pull. It will go much easier this way rather than pulling through coiled conduit!
- Reassemble the cables in the Pelican box. Any excess cable should be coiled with the conduit cable clamped to the mounting post as shown in figure 6.
Click on photos to enlarge.
-
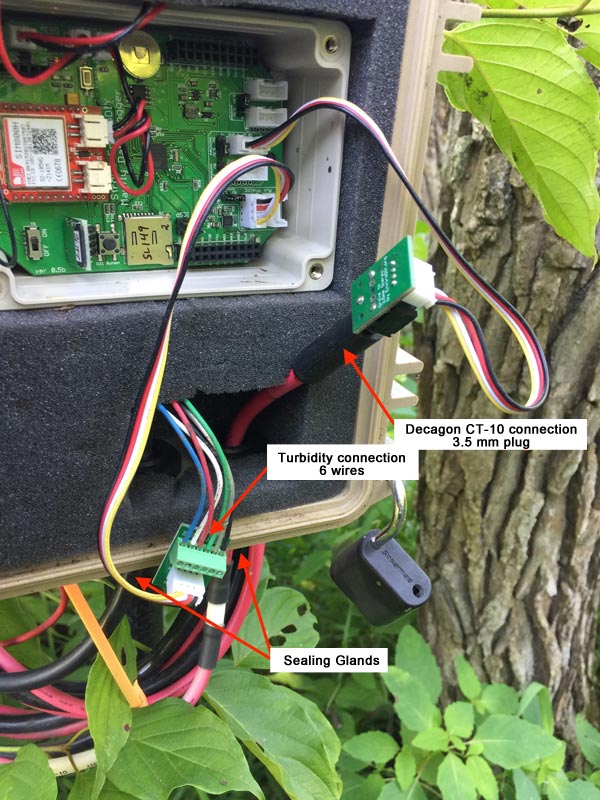
- Figure 3. Cable connections exposed.
-
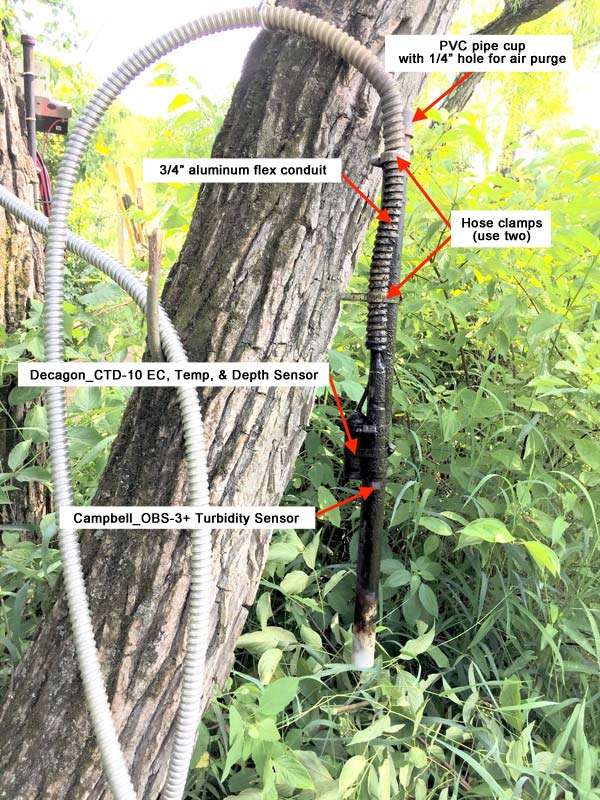
- Figure 4. Sensor bundle with conduit.
-
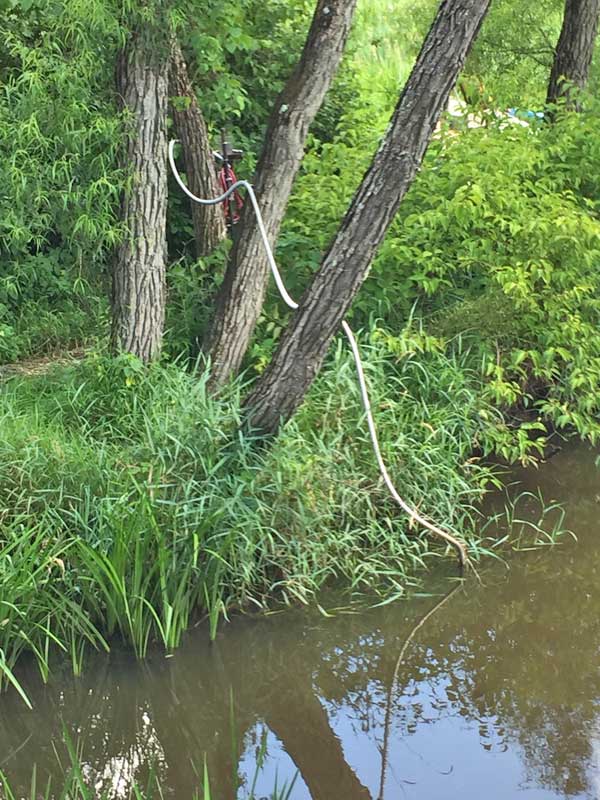
- Figure 5. Installation at BCMC3S (Moores Rd).
Mayfly Station Deployment
If this is an upgrade of an existing station I would recommend replacing the anchor pins with a PVC cap of an appropriate size (most of the sensor bundles are on 1 ¼” PVC). Drill a ¼” hole in the cap for air to escape and let the sensor bundle rest the support pipe or rod.
This method of beaver proofing does have the drawback of no longer being a stealth installation. However, I see no reason the conduit can’t be attached to the sensor bundle pointing down so the whole affair is underwater. The pictures below show some of the Great Marsh Institute (GMI) installations that are in use in Great Marsh (northern Chester County, Pennsylvania). These include the Mayfly CTD/turbidity stations and the GMI Low-Cost Electrical Conductivity (LEC) stations.
Some of the LEC stations are in shallow (2-3”) streams and clamping the conduit with the probe protruding a few have worked well. I use a garden stake with the conduit/probe assembly clamped to the downstream side of the stake to reduce sediment fouling of the EC probe.
-
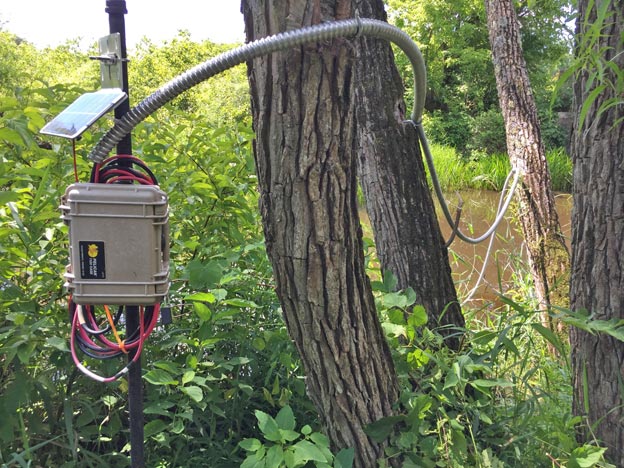
- Figure 6. BCMC4S – example of making use of available support.
-

- Figure 7. LEC station in shallow stream.
neilh20
Thanks for the posting. In N California I’ve had a squirrel chew through some power wiring at one site. I think in the end it was to do some armored flexible PVC tubing.
Jim Moore
Sensor bundle alternative deployment
A Mayfly sensor station was installed at Marsh creek on May 21, 2018 following the procedure given in the EnviroDIY installation manual. This involves inserting a clip (basically an oversized safety pin) thru holes in the sensor bundle’s PVC pipe and the predrilled holes in the anchor pin. Fairly straight forward on dry land but try doing this in winter with the water temps a few degrees above 0ºC. I did this once to clean a sensor bundle in winter – never again!
I understand the issue of keeping the sensor bundle oriented if a turbidity sensor is installed so that it doesn’t rotate. Without a turbidity sensor this is not an issue and simply putting a cap on the sensor bundle PVC pipe with a ¼ “ hole drilled in it to let the air escape and drop it over the anchor pin. The pin will support the sensor bundle and the depth will be consistent between servicing of the sensor bundle. Another advantage of this support method is cost of a pre drilled pin vs. the cost of standard ½ “ rebar. Less than $4 vs. about $10 for the predrilled pin.
If the sensor station has a turbidity sensor this method becomes even more desirable since the turbidity sensor will require much more service even in winter to clean the sensor window. For this I would recommend beaver proofing the station which should be done anyway if any beaver are around. The ¾ “ flex conduit attached to the sensor bundle will keep it in a fixed orientation. See my note on Beaver proofing in the EnviroDIY forum.