@vogelrnws
Active 8 years, 3 months agoForum Replies Created
-
AuthorPosts
-
Yes, this was a custom board I designed for the NWS ASOS program. We are using it for a translator to connect a Vaisala HMP-155E to the ASOS. The original ASOS is RS-232 over fiber and we aren’t able to change the source code any longer. So adding a new sensor required me to make the HMP-155E talk to our system like it was a different sensor. Taking in the RS-485 data stream from the sensor and reformatting that data to report as an older TSL 1088 unit.
The Rpi Pico only has 2 uarts but it also has serialPIO ports than can be configured to run many different peripherals
If you are worried about paying for cellular service you might look into Twilio. They have a SuperSim that we used in our XBee-NB/IOT units that will connect to 4 carriers. It costs $2 month for the card and they only charge you for usage. We were running MQTT w/TLS with small messages for temp every 5 and precip every 15 with other hourly products, FTPS for remote updates. Cost us less than $10 month
@neilh20 Yes, the chip supply pretty much put a spike in the Teensy 3.5 for any type of continued development and usage with that chipset. We used the 3.5 because of it’s 5V tolerant I/O. The Teensy 4.1 did not have that so the project stalled for a bit. I believe the folks who have taken that project over are considering moving the XBee to a Campbell Scientific datalogger.
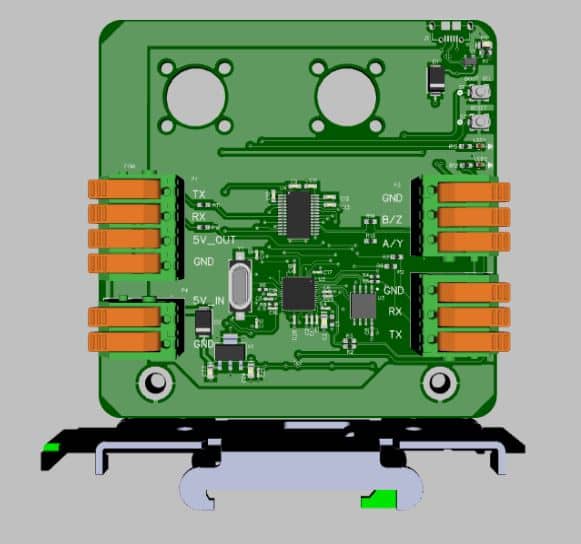
Outside of that project I started building boards using the RP2040 microcontroller used in the RPi PICO. It’s very versatile, the drag and drop bootloader is a very nice feature and its still very much usable within the Arduino framework. Picture attached is a version used in one of our systems that mounts to a din rail and has the mounting holes built in for our fiber optic modem. RS-485/RS-232 on one side. Power and dedicated RS232 and power for the fiber modem on the left. Board communications with user for debug/loading are via usb although the part itself is missing in this picture (top right)
Attachments:
Has anyone looked to see if the SDI-12 library could be ported to the new RP2040 chip. Maybe that already works in its existing state, but I haven’t see it mentioned anywhere. This is the new IC that runs the RPi Pico and can be used via the Arduino language.
Can you provide more details especially in reference to your code and how you are connecting to thingspeak?
That is the version of XBee I use as well. They are very short supply. I only have some cause we bought a large supply of them bout a year ago. The dev board I use with mine to upgrade the cellular firmware and normal XCTU operations is the XBIB-CU-TH. Digi-Key has 200+ of those.
No, the apn would need to be loaded via XCTU or you can place it in the python code before the cellular connection action…
xbee.atcmd(“AN”, “hologram”) —–or whatever your apn is
conn = network.Cellular()
Any arduino code you would like to use. The key is to identify which serial port you have connected to the XBee. For instance if you have it connected to Serial1 then you would want to print out the statements you want sent to Thingspeak like so…
Topic posting to includes multiple fields
Serial1.println(#Pfield1=60&field2=45)
Topic posting to is field specific to field1:
Serial1.println(#P60)
The #P is the identifier the xbee python code is looking for to identify the data you want sent. the println() includes the \r\n characters that allow the python code to separate multiple post request coming in one after the other.
it seems I have to add your contact email to allow the share. I’ll see if I can post the zip file. It didn’t like the .py files before
-
AuthorPosts